Showing posts with label DIY. Show all posts

Thursday, January 14, 2016

Two Good Things...

Today I am writing about two good (actually great) things:

1. Getting more sleep
2. A free printable

If you are over the age of 5, you probably like sleep and do your best to get a reasonable amount. If you are under the age of 5, you probably try to avoid sleep like the plague. If you are the parent of someone under the age of 5, this can be a problem.

My daughter has always been a relatively good sleeper, however she did have a tendency to start her day ridiculously early (5:30 am) when she was little (ages 1 - 4). Then, when she was about 4 years old, she started waking up a few times during the night. I did not enjoy this new development. So, I decided to take matters into my own hands and come up with a reward system that might help her sleep through the night again.

I came up with "sleep tickets". I designed a bunch of these cute tickets, printed them on card stock and cut them out. Each morning, if my daughter had had a good night's sleep (no wake-ups), she received a sleep ticket. At the end of a set period of time, we counted up her sleep tickets, and if she had enough, she got a reward.


My daughter is incredibly reward-motivated, so this system worked like a charm! I do not claim to be an expert on getting children to sleep better, but the sleep tickets worked for us. And if it helps at least one little munchkin (and their parents) get a bit more rest, then I call that a success!


You can download your free printable right here.

Simply print, cut out and enjoy!

xo
Claire


Friday, August 6, 2010

A Very Simple Felt Board


A little while back, I made this little felt board for my daughter. It was really easy to make, and Luca has a great time playing with it. Plus, it is one of those toys that you can constantly modify by adding new felt pieces.

I started by buying a basic white frame. Any size will do, but this one was 21 x 17". I removed the glass and mat from the frame (I used the mat for this project). Then I cut a piece of cardboard (I used the cardboard that the frame was packaged in) to fit the frame. I cut a piece of blue felt slightly larger than the cardboard.


I attached the felt to the cardboard by gluing the overhanging pieces of felt onto the back of the cardboard (it helps to cut triangles out of the corners so that you don't get bunching from excess felt). When the glue was dry I put the felt-covered cardboard in the frame, and voila!


So far I have just cut a few basic shapes out of colored felt, along with some pennant letters, but you could really have so much fun with this. I am thinking of buying one of these sets off of etsy if I don't get around to making my own.

Tuesday, July 27, 2010

Displaying Children's Artwork

We do a lot of painting at our house, and sometimes it can be hard to figure out what to do with all of the resulting artwork. I'm sure this has been done before, but I decided to cut out pieces of some of my daughter's paintings and frame them in a mat that I had leftover from a previous project (more on that later). And voila, here is the result:


I think it turned out pretty cute!

Sunday, July 11, 2010

Birthday Bash

My daughter turned 2 about a month ago and I was so excited that I went into party planning mode months in advance. I really wanted to create a fun and relaxed atmosphere for my daughter and about 9 of her friends (plus their mommies). I also wanted the day to reflect her personality and the things that she loves.
My little girl is really into butterflies and her favorite colors are pink and yellow, so that made coming up with a theme pretty easy: pink and yellow butterflies!
I kept the decor simple. I made two butterfly garlands out of pink, yellow and white vellum paper. I got the idea here.


The one change I made was to hand sew, rather than use a sewing machine. This was primarily because I wanted to have a lot of control over the spacing between the butterflies.


The rest of the decor consisted of pink, yellow and white balloons, and some butterfly shaped confetti that I purchased from Paperika and sprinkled on the dining room table.


Every child received their own party cup to use (and take home with them). I designed some simple labels and stuck them on some straw cups that I found at Target.


Then I made some custom paper party hats (I used an old hat that we had as a template), and a special "2" crown for my daughter.
The menu consisted of my daughter's favorite foods: hot dogs, fruit, pretzels, veggies, guacamole and chips. It was the dessert that was probably the most labor-intensive part of the whole process. I made chocolate cupcakes with buttercream icing, and decorated them with pink and yellow fondant butterflies.


Then I made sugar cookies and decorated them with pink and yellow royal icing.


I got all of my recipes from the wilton website and read some excellent cookie decorating tutorials at prudent baby.
The treat boxes were small brown paper boxes that I sealed with round labels (bought at Michael's in the wedding section).


I stuffed them with teddy grahams and some fabulous recycled butterfly crayons that I bought at Gaddy Nipper Crayons.
It turned out to be a beautiful day, and my daughter had a blast, which made the late nights decorating cookies and sewing butterflies totally worth it!
Here's my little girl enjoying her cupcake:


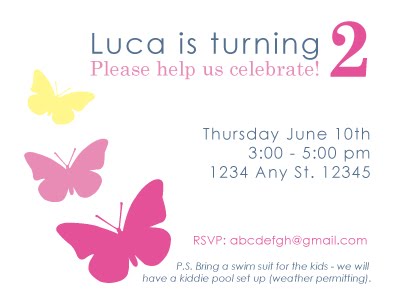
Oh, and this was the invitation that I designed:

Thursday, July 30, 2009

Repurposed IKEA Curtain Wire

My husband and I were given a photography portfolio as wedding gift from our friend/photographer Jason Reed. I wanted to display the photos in my breakfast area with the ability to rotate the collection with ease. Custom framing and mounting was out of my budget. Enter:IKEA


Using DIGNITET curtain wire and clips from IKEA, I was able to achieve an easy, modern, and inexpensive solution.


Cost:
2 DIGNITET curtain wire kits 14.99/each
1 pack of DIGNITET clips 4.99/pack of 24

This is also a great way to display children's artwork throughout the school year.

Monday, June 15, 2009

Celebrating in Style

We celebrated my daughter's 1st birthday on the weekend, and judging by how much fun she had, I would say it was a huge success. I only wish I had taken a few more photos of the decorations. But, these will have to do...


I made the cupcakes using this recipe, which I found via the wonderful blog 52 Cupcakes. They were surprisingly easy to make, and very yummy.

The cupcake toppers were pretty easy as well. I just created a simple design on the computer and printed it out onto some patterned paper. Then, I cut them out and glued them onto toothpicks.
Voila!


To read more about the prep work I did for the party click here.

Tuesday, June 9, 2009

Not Your Mother's DIY Magazine


If you want to make it, eat it, buy it, organize it, you're bound to locate it here!

Monday, June 8, 2009

Getting Ready

With my daughter's first birthday just two days away, I have turned into a crafting machine. I am making a paper 'Happy Birthday' banner, which I started assembling yesterday.


I also purchased Martha Stewart's Tissue Paper Pom-Pom Kit, and will be hanging the pom-poms from the ceiling. I will be making her cupcakes from scratch (please wish me luck on that one), and am making cupcake toppers from the same paper that I used for the banner.


I also made her a birthday onesie (that's my design, above). When I told my husband what I was doing, he said "Don't they sell pre-made 'first birthday' outfits?". I just looked at him and said, "Do you even know me? Of course I HAVE to make it myself!". It's just way too much fun.

I'm going for a casual, summer garden-party vibe. Hopefully it turns out - I will post pictures once we have everything set up.
Wish me luck!

Tuesday, May 26, 2009

DIY Project: Chinese Garden Stools

This is a really easy, fun project.
I found these 2 Chinese Garden Stools at a local thrift store for about $70 a piece.


They're cute, but they didn't match our decor (or each other). So, I primed them with 3 coats of a Shellac-based primer (one that is good for use on ceramics), then painted them with three coats of an All Surface Enamel (acrylic latex high gloss) from Sherwin Williams in 'Cooled Blue'. I also sanded them lightly between coats of paint for a smoother finish. And here is the result: