Saturday, January 30, 2016

Valentine's Day Round-Up

You guys, I love Valentine's day; not for any sappy or sentimental reasons. I think my love for Valentine's day really centers around all of the cute and creative craft and gift options. Just do a quick search on Pinterest, and you will be overwhelmed with ideas.
This year I plan to do a couple of easy craft projects, which I will share here (including one free printable)! I have also been spending way too much time searching online for sweet gift ideas. Here are my favorites:

1. Cute T-shirts for the kids. I think these ones are sweet without being too cutesy:

Love Cloud T-shirt from JaxandAce.


Kawaii Heart T-shirt from Whistle & Flute Clothing.


2.  You can never have too many accessories:

This adorable zipper pouch from Paper Source.


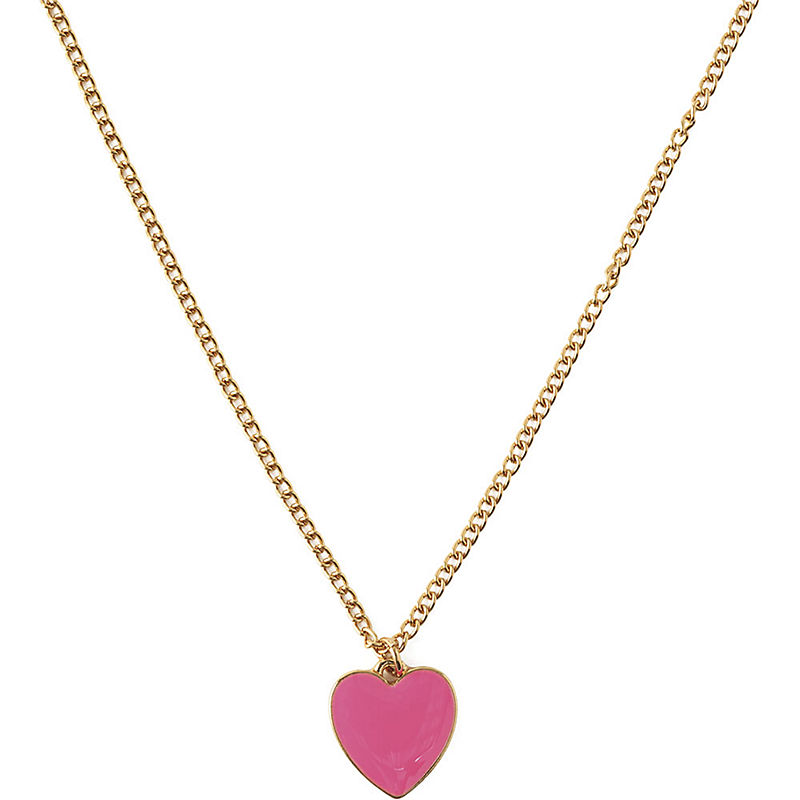
Ban.do Pink Heart Necklace from Paper Source.


XO Metallic Temporary Tattoos from HappyTatts.


3. Last, but not least: balloons and confetti (of course)!

XO Balloons from The Party Dialect.


Hearts Tissue Paper Confetti from Paper Source.


Happy Heart Day, and stay tuned for some Valentine's-Themed craft projects!


Monday, January 25, 2016

Moving Part 2: Dining Room Design

I had a harder time designing this room. I'm not sure why.... I know that I definitely want a blonde-wood dining table, black dining chairs, and a white sideboard. I guess it was the accessories that tripped me up this time. I love all of the pieces individually, just trying to decide if they work together. I would love to hear your feedback!

P.S. How cute is that donut print?


1. Donut Art Print by Fah + Mindo from Society6 | 2. Good Vibes Only Print by Pink Sunset from Society6 | 3. Besta Sideboard from Ikea | 4. Pineapple Candle from h&m | 5. Black Vase from h&m | 6. IDOLF Black chair from Ikea | 7. Triangle Rug from Urban Outfitters | 8. LISABO Dining Table from Ikea | 9. Geodesic Bowl from CB2 | 10. Black Chair from allmodern.com.


XO
Claire

Sunday, January 17, 2016

Moving Part 1: Living Room Design

In a couple of months we will be moving to a new house. Luckily we aren't moving far, so (fingers crossed) it shouldn't be too stressful. Even though there are lots of things not to like about moving: the upheaval, the chaos, the physical labour; there is one thing that I really do love about moving: getting to start fresh with a clean slate!
I love the potential of a new space. It presents an opportunity to get rid of things, find new ways to use or display things you already own, and an excuse to buy some new things. So, while I know it will take time to settle into our new home, arrange our belongings and purchase a few new pieces, it is still really fun to plan our new digs.
I have been playing around with a lot of designs and ideas. I love to create inspiration boards like the one below because they help me get a sense of the overall feeling and colours that I want to incorporate into a room. I know that our living room won't look exactly like this, but this is the vibe that I'm going for:


1. Sea Art Print by Studio VII from Society6 | 2. TX02 Art Print by Georgiana Paraschiv from Society6 | 3. Hektar Floor Lamp from Ikea | 4. Large Wire Basket from H&M | 5. Arm Chair from allmodern.com | 6. Kilim Pillow from Urban Outfitters | 7. International Lux Coffee Table from allmodern.com | 8. Rug from Urban Outfitters | 9. Gold Pouf from Lulu and Georgia | 10. Sofa from wayfair.ca | 11. Eye Pillow from Urban Outfitters

Over the coming weeks I hope to put together similar inspiration boards for a few more rooms. Stay tuned!


xo
Claire

Thursday, January 14, 2016

Two Good Things...

Today I am writing about two good (actually great) things:

1. Getting more sleep
2. A free printable

If you are over the age of 5, you probably like sleep and do your best to get a reasonable amount. If you are under the age of 5, you probably try to avoid sleep like the plague. If you are the parent of someone under the age of 5, this can be a problem.

My daughter has always been a relatively good sleeper, however she did have a tendency to start her day ridiculously early (5:30 am) when she was little (ages 1 - 4). Then, when she was about 4 years old, she started waking up a few times during the night. I did not enjoy this new development. So, I decided to take matters into my own hands and come up with a reward system that might help her sleep through the night again.

I came up with "sleep tickets". I designed a bunch of these cute tickets, printed them on card stock and cut them out. Each morning, if my daughter had had a good night's sleep (no wake-ups), she received a sleep ticket. At the end of a set period of time, we counted up her sleep tickets, and if she had enough, she got a reward.


My daughter is incredibly reward-motivated, so this system worked like a charm! I do not claim to be an expert on getting children to sleep better, but the sleep tickets worked for us. And if it helps at least one little munchkin (and their parents) get a bit more rest, then I call that a success!


You can download your free printable right here.

Simply print, cut out and enjoy!

xo
Claire


Monday, January 11, 2016

Ode To Coffee...

Okay, so I might be a little bit (lot a bit) obsessed with coffee. Like, it makes me really really happy. A strong, dark roast in the morning gets me going, and a good latte in the afternoon has the ability to completely turn my day around.
My husband knows how much I rely on/love coffee, which is why he got me this ah-mazing mug for Christmas! It makes me smile every day.


You can get your very own at indigo.

So, I was inspired to put together a little round-up, based on my undying love for coffee...


1. This print, by Matthew Taylor Wilson on Society6 is everything!!! I take my coffee black, so it is the perfect fit.


2. This T-shirt really gets to the point, no messing around. I like that.


3. This is such a pretty print. It would look lovey hanging over my desk.


4. And last but not least, my favourite brew from Kicking Horse. So good!

Here's to a new week; stay caffeinated, stay creative, and stay warm (it's chilly here in Toronto)!

xo
Claire

Saturday, January 9, 2016

Here's to new beginnings...


Image cred: PinkPot

Here's to a new year full of potential!
It appears that I have abandoned this blog for long enough. Finally, the pull to create and share my creations has gotten so strong that I can no longer ignore it. That's a dramatic way of saying: I'm ready to take some concrete steps towards living a more creative life and putting my art 'out there' - ha!
I find myself constantly composing blog posts in my head, or coming up with ideas for designs or paintings. And I guess it just feels like the right time to get those things out of my head.
The kids are a little bit older now and are both in school full time. So, that frees up a bit of my energy. Plus, we are living close to family again. I guess there is something about having the security of family, friends and supporters around that makes me more inclined to take risks (I am naturally so incredibly risk-adverse)!
So, here it goes.... Here are my goals for 2016:

1. Start posting on this blog again (at least 3 times per week).
2. Open an etsy store, focusing on printables of my designs. I have signed up for Etsy Resolution Canada - an amazing-sounding group that I hope will give me the motivation and the tools to finally get my store up and running. Sign up before Jan 25th!!!
3. To sell at least one piece on society6.
4. To work on at least one painting per month.

So, there you have it, my goals for the new year. I will keep you posted on my progress. Did you make any resolutions or goals for 2016? I would love to hear them!

Cheers!


Thursday, September 9, 2010

Designing a 'Big Girl' Room

As we prepare to transition our little girl from a crib to a twin bed, I am inspired to give my daughter's bedroom a bit of an update. The design that I originally used for her room was relatively simple and gender neutral (since we didn't find out if 'the baby' was a boy or a girl). But, now that she is 2 and has a definite personality and style of her own, I think it's time to give her room some character. Here are some of my ideas:


1. Yellow and White Zig Zag fabric from Hodi and Poppi Fabrics
2. Amy Butler Floating Buds fabric from Seth Grayson
3. Take Shelter print from Ashley G and Drew
4. Love Candy print in lemon from Made By Girl
5. Pretty Bird plush from Pretty Little Things
6. Tall Wood Bed Frame in white from West Elm
7. DwellStudio for Target rug (we already own this rug and it is no longer listed on Target's website)

I will post updates once the room is in progress / completed. What do you think so far?

Wednesday, September 8, 2010

Back From Vacation


A bad case of the flu, 3 weeks out of the country (on vacation) and potty training have kept me away from this blog for a little while. But, now that we are back home and settled, I am feeling ready to start posting again. Plus, I received a little extra incentive this morning via an email from Apartment Therapy. Luca's birthday party is featured today on Ohdeedoh. If you are unfamiliar with Apartment Therapy and their children's site, Ohdeedoh, you Must Check Them Out Now. I always find inspiration and great ideas on both of these sites, so I am very honored to be featured.
Lots more posts coming soon :)

Friday, August 6, 2010

A Very Simple Felt Board


A little while back, I made this little felt board for my daughter. It was really easy to make, and Luca has a great time playing with it. Plus, it is one of those toys that you can constantly modify by adding new felt pieces.

I started by buying a basic white frame. Any size will do, but this one was 21 x 17". I removed the glass and mat from the frame (I used the mat for this project). Then I cut a piece of cardboard (I used the cardboard that the frame was packaged in) to fit the frame. I cut a piece of blue felt slightly larger than the cardboard.


I attached the felt to the cardboard by gluing the overhanging pieces of felt onto the back of the cardboard (it helps to cut triangles out of the corners so that you don't get bunching from excess felt). When the glue was dry I put the felt-covered cardboard in the frame, and voila!


So far I have just cut a few basic shapes out of colored felt, along with some pennant letters, but you could really have so much fun with this. I am thinking of buying one of these sets off of etsy if I don't get around to making my own.

Wednesday, August 4, 2010

Now this is my kind of sewing machine...


I'm not sure that my daughter would know what to do with this, since my sewing machine hasn't seen the light of day in quite some time. But, it's so cute that she might have to fight me for it.
This pretend plush sewing machine is from the etsy shop Nifty Kid Stuff. They also have some adorable plush bunnies and pretend cake decorating sets.

The owner, Caitlin also has a great blog. You can check it out here.

Monday, August 2, 2010

ABC!

I just designed an alphabet poster for my daughter, so now I've got letters and typography on the brain. I love how a simple letter can look so beautiful, graphic and bold. As a designer, I have so much fun playing with different fonts, colors and negative space. With that in mind, here are some of my favorite 'typography/alphabet' themed finds on etsy:


White Wood Ampersand by Hindsvik


Paris Letters - 5x5 Original Photos by Little Brown Pen


Initial Letter G (from Antique Typewriter) by QA Create


Yellow Orange and Pink Alphabet Pillow by Pillow Factory


Wood Alphabet Blocks by August Grove

Friday, July 30, 2010

Stylish Storage

I have been a big fan of Sewing Momma on etsy for quite a while. Her shop's tagline is "Trying to make organizing pretty", and I think she has succeeded. These beautiful storage bins could be used to store just about anything. Here are a few of my favorites:


Large Comfy Storage Bin


Extra Deep Fabric Bin


Perched on a Branch Fabric Storage Bin

Thursday, July 29, 2010

Love this!


I found this free printable alphabet bunting at Ruffled via How About Orange. It's so cute (and free) that I just had to share. I think I might print these out, attach some felt to the back and let Luca use them on her felt board.

Tuesday, July 27, 2010

Displaying Children's Artwork

We do a lot of painting at our house, and sometimes it can be hard to figure out what to do with all of the resulting artwork. I'm sure this has been done before, but I decided to cut out pieces of some of my daughter's paintings and frame them in a mat that I had leftover from a previous project (more on that later). And voila, here is the result:


I think it turned out pretty cute!

Sunday, July 11, 2010

Birthday Bash

My daughter turned 2 about a month ago and I was so excited that I went into party planning mode months in advance. I really wanted to create a fun and relaxed atmosphere for my daughter and about 9 of her friends (plus their mommies). I also wanted the day to reflect her personality and the things that she loves.
My little girl is really into butterflies and her favorite colors are pink and yellow, so that made coming up with a theme pretty easy: pink and yellow butterflies!
I kept the decor simple. I made two butterfly garlands out of pink, yellow and white vellum paper. I got the idea here.


The one change I made was to hand sew, rather than use a sewing machine. This was primarily because I wanted to have a lot of control over the spacing between the butterflies.


The rest of the decor consisted of pink, yellow and white balloons, and some butterfly shaped confetti that I purchased from Paperika and sprinkled on the dining room table.


Every child received their own party cup to use (and take home with them). I designed some simple labels and stuck them on some straw cups that I found at Target.


Then I made some custom paper party hats (I used an old hat that we had as a template), and a special "2" crown for my daughter.
The menu consisted of my daughter's favorite foods: hot dogs, fruit, pretzels, veggies, guacamole and chips. It was the dessert that was probably the most labor-intensive part of the whole process. I made chocolate cupcakes with buttercream icing, and decorated them with pink and yellow fondant butterflies.


Then I made sugar cookies and decorated them with pink and yellow royal icing.


I got all of my recipes from the wilton website and read some excellent cookie decorating tutorials at prudent baby.
The treat boxes were small brown paper boxes that I sealed with round labels (bought at Michael's in the wedding section).


I stuffed them with teddy grahams and some fabulous recycled butterfly crayons that I bought at Gaddy Nipper Crayons.
It turned out to be a beautiful day, and my daughter had a blast, which made the late nights decorating cookies and sewing butterflies totally worth it!
Here's my little girl enjoying her cupcake:


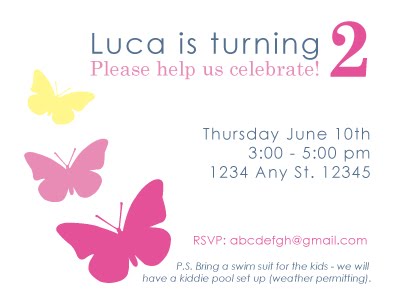
Oh, and this was the invitation that I designed:

Friday, November 20, 2009

Modern High Chair: IKEA

While doing a little shopping at the Houston IKEA this week, this [straight out of the Jetsons] high chair caught my eye. I have not read any reviews for the Leopard, but after seeing that it retails for only $60.00 I am left feeling a bit silly for my foolhardy spending on my Svan.


The Leopard is not listed on the IKEA website, but here are the details:
The plastic base: black or white
The seat: red, grey, black & white (if you tire of one color, you can buy another for $20.00)
The tray is detachable

Thursday, October 15, 2009

You will love this magazine...


If you were a devoted reader of the late great Domino, you will be very excited to learn about the brand new Lonny Magazine. Lonny is an online mag, whose mission is "to reopen the doors of accessible design." (in a time when shelter publications are turning their last pages).
And let me tell you, they have blown the doors wide open with a breath of fresh air. In fact, stumbling across Lonny (thank you decor8) is what finally inspired me to get creative again (after a much-too-long hiatus). I am now officially painting, creating and blogging again. Thank you Lonny!

P.S. You can check them out on facebook too.

Thursday, July 30, 2009

Repurposed IKEA Curtain Wire

My husband and I were given a photography portfolio as wedding gift from our friend/photographer Jason Reed. I wanted to display the photos in my breakfast area with the ability to rotate the collection with ease. Custom framing and mounting was out of my budget. Enter:IKEA


Using DIGNITET curtain wire and clips from IKEA, I was able to achieve an easy, modern, and inexpensive solution.


Cost:
2 DIGNITET curtain wire kits 14.99/each
1 pack of DIGNITET clips 4.99/pack of 24

This is also a great way to display children's artwork throughout the school year.

Wednesday, July 15, 2009